小内存VPS的生存之道:Nginx + PHP FPM + Varnish

我用的是BuyVM.net一年$15的VPS,可想而知这个主机的配置是如何Economy: 128M 内存。原来使用的是Apache 1.3 prefork 和 Php_mod,系统稳定性非常好,然而性能可以说令人失望,打开一个简单的静态页面平均需要3秒,而使用wordpress及若干plugin后,差不多需要10秒以上才能访问页面,而且这是打开WP-Supercache后的性能。据我的观察,这是因为Apache进程会fork出很多子进程,这些进程吃掉了有限的VPS内存。2月的最后一天,我决定试一试传说中Nginx,看看它在小内存的VPS上表现是否优异。在8000端口打开Nginx后,使用http://whichloadsfaster.com/ab – Apache HTTP server benchmarking tool 比较Nginx和Apache的速度,毫无悬念的,Nginx要快,平均只用了1/4的时间。因此我下定决心,将整个VPS升级到Nginx+PHP FPM。具体的步骤如下:

1. 升级Ubuntu 10.04 LTS Lucid 到 10.10 Maverick

升级的目的是使用Ubuntu官方的PHP,因为只有10.10版的PHP5才包括了php5-fpm功能。

具体方法(翻译自http://www.howtoforge.com/how-to-upgrade-ubuntu-10.04-lucid-lynx-to-10.10-maverick-meerkat-desktop-and-server-p2):

aptitude install update-manager-core

改变 /etc/update-manager/release-upgrades 中Prompt=normal

do-release-upgrade

我在升级中反复遇到关于procps的这个提示:start: Unknow Jobs: procps

解决方法就是建立一个/etc/init/procps.conf,然后继续apt-get upgrade就行。

原理是service 这个命令会调用/etc/init.d下面的脚本,而procps的脚本会用start命令,start procps命令会调用initctl start procps, 这个过程中需要/etc/init/procps.conf来设定procps相关的参数。在ubuntu升级的时候,这个配置文件缺失造成了上述问题。


2. 安装Nginx

先卸载Apache, 用apt-get install nginx就行,之后参考:

http://www.howtoforge.com/installing-nginx-with-php-5.3-and-php-fpm-on-ubuntu-lucid-lynx-10.04-without-compiling-anything

我这里也列出了自己的nginx.conf文件内容,注意我使用了rewrite功能。这一功能在Apache里是用mod_rewrite支持,在.htaccess里指定的。我们写在nginx.conf文件里也不复杂。另外,末尾的backend语句似乎是必须的,没有它PHP似乎就无法工作。

My /etc/nginx/nginx.conf

user www-data;
worker_processes  1;

error_log  /var/log/nginx/error.log;
pid        /var/run/nginx.pid;

events {
 use epoll;
 worker_connections  1024;
 # multi_accept on;
}

http {
 include       /etc/nginx/mime.types;

 access_log  /var/log/nginx/access.log;

 sendfile        on;
 #tcp_nopush     on;

 #keepalive_timeout  0;
 keepalive_timeout  65;
 tcp_nodelay        on;

 gzip  on;
 gzip_disable "MSIE [1-6]\.(?!.*SV1)";

 include /etc/nginx/conf.d/*.conf;
 include /etc/nginx/sites-enabled/*;
}

My /etc/nginx/sites-enabled/default

 server {
 listen   8080;
 server_name  zhanxw.com;
 access_log  /var/log/nginx/localhost.access.log;

 root    /var/www;
## Default location
 location / {
 root   /var/www;
 index  index.php index.html;
 }

location /blog/ {
 index index.php;
 if (-e $request_filename) {
 break;
 }
 rewrite ^/blog/(.+)$ /blog/index.php?q=$1 last;
 }

## Images and static content is treated different
 location ~* ^.+.(jpg|jpeg|gif|css|png|js|ico|xml)$ {
 access_log        off;
 expires           30d;
 root /var/www;
 }

## Parse all .php file in the /var/www directory
 location ~ .php$ {
 fastcgi_split_path_info ^(.+\.php)(.*)$;
 fastcgi_pass   backend;
 fastcgi_index  index.php;
 fastcgi_param  SCRIPT_FILENAME  /var/www$fastcgi_script_name;
 include fastcgi_params;
 fastcgi_param  QUERY_STRING     $query_string;
 fastcgi_param  REQUEST_METHOD   $request_method;
 fastcgi_param  CONTENT_TYPE     $content_type;
 fastcgi_param  CONTENT_LENGTH   $content_length;
 fastcgi_intercept_errors        on;
 fastcgi_ignore_client_abort     off;
 fastcgi_connect_timeout 60;
 fastcgi_send_timeout 180;
 fastcgi_read_timeout 180;
 fastcgi_buffer_size 128k;
 fastcgi_buffers 4 256k;
 fastcgi_busy_buffers_size 256k;
 fastcgi_temp_file_write_size 256k;
 }

## Disable viewing .htaccess & .htpassword
 location ~ /\.ht {
 deny  all;
 }
}
upstream backend {
 server 127.0.0.1:9000;
}

3. 安装PHP FPM

使用apt-get install php5-fpm php-apc php5-cgi php5-cli php5-mysql php5-common php-pear php5-curl php5-suhosin php5-gd php5-imagick imagemagick php5-mhash php5-mcrypt即可。

注意安装后可以用service php5-fpm start来检查是否有缺失的php5模块。例如如果见到:

* Starting PHP5 FPM… PHP Warning: PHP Startup: Unable to load dynamic library ‘/usr/lib/php5/20090626+lfs/mcrypt.so’ – /usr/lib/php5/20090626+lfs/mcrypt.so: cannot open shared object file: No such file or directory in Unknown on line 0

Feb 27 15:40:28.053288 [WARNING] [pool www] pm.start_servers is not set. It’s been set to 10.

这说明应该安装php5-mcrypt。后面的WARNING可以忽略。

另外,小内存VPS上使用PHP-FPM可以控制其进程个数。在我的VPS上,单个PHP-FPM可以使用多达100M的内存,同时我的访问量很少,因此我设置PHP-FPM使用static方式维持2个进程。从实践来看系统可以保持合理的响应时间,同时内存不会被用光。

我的PHP-FPM 的配置文件/etc/php5/fpm/pool.d/www.conf  列在下面:

 ...
; Choose how the process manager will control the number of child processes.
; Possible Values:
;   static  - a fixed number (pm.max_children) of child processes;
;   dynamic - the number of child processes are set dynamically based on the
;             following directives:
;             pm.max_children      - the maximum number of children that can
;                                    be alive at the same time.
;             pm.start_servers     - the number of children created on startup.
;             pm.min_spare_servers - the minimum number of children in 'idle'
;                                    state (waiting to process). If the number
;                                    of 'idle' processes is less than this
;                                    number then some children will be created.
;             pm.max_spare_servers - the maximum number of children in 'idle'
;                                    state (waiting to process). If the number
;                                    of 'idle' processes is greater than this
;                                    number then some children will be killed.
; Note: This value is mandatory.
pm = static

; The number of child processes to be created when pm is set to 'static' and the
; maximum number of child processes to be created when pm is set to 'dynamic'.
; This value sets the limit on the number of simultaneous requests that will be
; served. Equivalent to the ApacheMaxClients directive with mpm_prefork.
; Equivalent to the PHP_FCGI_CHILDREN environment variable in the original PHP
; CGI.
; Note: Used when pm is set to either 'static' or 'dynamic'
; Note: This value is mandatory.
pm.max_children = 2

...

4.安装eAccelerator

主要参考:http://developer.mindtouch.com/en/kb/Improve_PHP_performance_with_eAccelerator_on_Ubuntu_8.04_(Debian)

基本上下载,编译,安装。之后在php.ini中加入下面几行即可(注意.so文件的路径):

 ; eAccelerator configuration
; Note that eAccelerator may also be installed as a PHP extension or as a zend_extension
; If you are using a thread safe build of PHP you must use
; zend_extension_ts instead of zend_extension
;extension                       = "/usr/lib/php5/20060613+lfs/eaccelerator.so"
zend_extension                  = "/usr/lib/php5/20090626+lfs/eaccelerator.so"
eaccelerator.shm_size           = "16"
eaccelerator.cache_dir          = "/var/cache/eaccelerator"
eaccelerator.enable             = "1"
eaccelerator.optimizer          = "1"
eaccelerator.check_mtime        = "1"
eaccelerator.debug              = "0"
eaccelerator.filter             = ""
eaccelerator.shm_max            = "0"
eaccelerator.shm_ttl            = "0"
eaccelerator.shm_prune_period   = "0"
eaccelerator.shm_only           = "0"
eaccelerator.compress           = "1"
eaccelerator.compress_level     = "9"
eaccelerator.allowed_admin_path = "/var/www/eaccelerator"

安装完之后注意检查<?php phpinfo(); ?>页面的输出,保证eAccelerator开启。

5. 启用Varnish

偶然间听说Varnish可以做代理,提供系统响应速度。以我的经验来看,对于静态页面,通过Varnish获取页面和直接使用nginx差别不大(动态页面未测试)。但用Varnish在80端口监听,听起来可以把真正的服务器挡在Varnish之后,似乎可以增强安全性吧。我在VPS上安装Varnish,应注意Varnish本意的版本变化较快,在配置时应注意路径的变化。需要配置两个文件,第一个是

/etc/default/varnish 应改成START=yes,否则会出现这个错误Not starting HTTP accelerator varnishd http://twitter.com/#!/grosser/status/5249558112108544);另一个是/etc/varnish/default.vcl,我参考了http://wowubuntu.com/varnish.html 以及http://blog.mudy.info/2009/04/my-varnish-vcl-for-wordpress/,这里列出我的配置文件/etc/varnish/default.vcl:

 backend default {
.host = "localhost";
.port = "8080";
}
acl purge {
"localhost";
}
sub vcl_recv {
if (req.request == "PURGE") {
if (!client.ip ~ purge) {
error 405 "Not allowed.";
}
return(lookup);
}
if (req.url ~ "^/$") {
unset req.http.cookie;
}
}
sub vcl_hit {
if (req.request == "PURGE") {
set obj.ttl = 0s;
error 200 "Purged.";
}
}
sub vcl_miss {
if (req.request == "PURGE") {
error 404 "Not in cache.";
}
if (!(req.url ~ "wp-(login|admin)")) {
unset req.http.cookie;
}
if (req.url ~ "^/[^?]+.(jpeg|jpg|png|gif|ico|js|css|txt|gz|zip|lzma|bz2|tgz|tbz|html|htm)(\?.|)$") {
unset req.http.cookie;
set req.url = regsub(req.url, "\?.$", "");
}
if (req.url ~ "^/$") {
unset req.http.cookie;
}
}
sub vcl_fetch {
if (req.url ~ "^/$") {
unset beresp.http.set-cookie;
}
if (!(req.url ~ "wp-(login|admin)")) {
unset beresp.http.set-cookie;
}
}

插曲1:重置MySQL密码

好就不用MySQL的root密码,重置密码(适用于MySQL 5.1)可以参考:

Generic method http://dev.mysql.com/doc/refman/5.1/en/resetting-permissions.html

只需要3步:以--skip-grant-tables参数启动Mysql-server;启动mysql;执行

UPDATE mysql.user SET Password=PASSWORD('MyNewPass') WHERE User='root';
FLUSH PRIVILEGES;

插曲2:使Firefox 支持Java Applets

在设置PHP-FPM 参数不当时,有可能整个VPS的内存全部被吃光,这时没法用SSH登录,很多命令(sudo、ls、top)都无法执行,这时候可以用BuyVM.net 提供的 manage.buyvm.net 页面,以Java Applets方式以root身份登录到VPS。默认情况下,Ubuntu的Firefox不支持Java Applets,解决方法就是安装:icedtea6-plugin .


另附:Wordpress中插入代码的方法:

注意这里使用了中文的全角括号,以免Wordpress当成真正的代码。

【sourcecode language=”css”】
your code here
【/sourcecode】

具体的语言可以有:

  • actionscript3
  • bash
  • coldfusion
  • cpp
  • csharp
  • css
  • delphi
  • erlang
  • fsharp
  • diff
  • groovy
  • javascript
  • java
  • javafx
  • matlab (keywords only)
  • objc
  • perl
  • php
  • text
  • powershell
  • python
  • r
  • ruby
  • scala
  • sql
  • vb
  • xml

http://en.support.wordpress.com/code/posting-source-code/
Exact Logistic Regression

We will briefly explain why we would be interested in implementing exact logistic regression, then provides C++ and R codes.

1. Why exact test?

Since we want to have a clear mind of how likely/unlikely the realization we observed. In the classic example of 2×2 table without covariates, especially the 2×2 table has very few (<5) occurrence, Fisher exact tests are often applied, and large sample theory cannot give an accurate estimation.

2. Why exact logistic regression?

Fisher’s exact test cannot applied to logistic model. For example, when we have covariates in the model, we want BOTH estimate the effect size and get its exact p-value. In this case, only exact logistic regression provides solution.The theoretical background is provided in reference [1].

My implementation:

Download: exactLogisticRegression.tar

1. I verified the results with SAS.
2. The speed is comparable to, or faster than SAS.

Cons:
1. Only 1 interested parameter conditioning on all other parameter is supported for now.
2. I have not implemented the confidence limit parts, as it’s a bit more tedious.

R binding : mypackage_1.0.tar

See mypackage/R/rcpp_hello_world.R, I wrote a R function to wrap the C++ function.

R binding is helped by RCpp package. It greatly reduced the workload of exchanging date (in the form of matrix, list, vector) between C++ and R. A quick tutorial can be found from RCpp homepage(http://dirk.eddelbuettel.com/code/rcpp.html). For experienced Rcpp user, the quick-ref documentation (http://dirk.eddelbuettel.com/code/rcpp/Rcpp-quickref.pdf) is helpful.

【1】 Exact Logistic Regression, Robert E. Derr, SAS Institute Inc., Cary, NC http://support.sas.com/rnd/app/da/new/daexactlogistic.html

【2】Rcpp: Rcpp: Seamless R and C++ Integration dirk.eddelbuettel.com/code/rcpp.html

Laplacian Eigenmap 的R code 和结果

利用矩阵的分解和分析图是个很有意思的话题。当我们能用这个技术来改进PCA的时候,或者降维的时候,我们有可能相信有意思的结果会蹦出来。这里主要参考了文献【1】和Pluskid的blog【2】。其中【1】给出了推导过程:目标函数是二次型的矩阵,约束同样是二次型的;还有详细的Algorithm:里面最关键的一步是Generalized eigenvector problem(wiki有非常简短的介绍),理论上可以用Golub Matrix Computation Chapter 8 的方法(我没读,差不多忘了Numerial Method课的知识了),但我并没有使用。另外【2】里的文字流畅,言简意赅,是入门的好文章。

简单来讲,当利用k-neighbor 或\( \epsilon \)方法构造临街矩阵,利用Simpled minded(0 or 1)或者Heat Kernel来构建Weight矩阵后,我们的问题是求解:

$$ L f = \lambda D f \quad st. \quad f^T D f = 1 \quad \mathrm{and} \quad f^T D \mathbf{1} = 0 $$

我们已经知道D是一个对角阵,所以求解$$ D^{-1} L f = \lambda f $$即可。

考虑到约束条件,我们只需对每一个\(f[\latex]做如下变换:

$$ f^T D f = 1 \Rightarrow f = f / \sqrt{\sum_i f_i^2 d_i} $$

$$ f^T D \mathbf{1} = 0 \Rightarrow f = f – \frac{ \sum_i f_i d_i } { \sum_i d_i} $$

R code

LaplacianEigenmap.R Link

LaplacianEigenmapTest.R Link

结果:

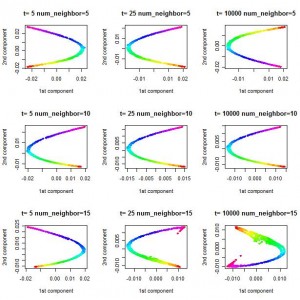
从 [latex] 0 = \lambda_0 \le \lambda_1 \le \lambda_2 \ldots \lambda_n \) 中取最小的两个非零的特征根\( \lambda_1\, \lambda_2 \)对应的特征向量,仿照paper,得到结果如下:

注意,这里的图案和paper不符,但我的验算,检查是否是特征值、约束条件,表明我的计算过程应该是正确的。

另外Pluskid 的Blog上的图案中,Laplacian Eigenmap的结果是一个彩带, 我认为有可能是使用了\( \lambda_0, \lambda_1 \)对应的特征向量。

参考:

【1】Mikhail Belkin and Partha Niyogi, “Laplacian Eigenmaps for Dimensionality Reduction and Data Representation,” Neural Computation 15, no. 6 (February 6, 2011): 1373-1396.

【2】漫谈 Clustering (番外篇): Dimensionality Reduction http://blog.pluskid.org/?p=290

Kernel PCA 原理和演示

主成份(Principal Component Analysis)分析是降维(Dimension Reduction)的重要手段。每一个主成分都是数据在某一个方向上的投影,在不同的方向上这些数据方差Variance的大小由其特征值(eigenvalue)决定。一般我们会选取最大的几个特征值所在的特征向量(eigenvector),这些方向上的信息丰富,一般认为包含了更多我们所感兴趣的信息。当然,这里面有较强的假设:(1)特征根的大小决定了我们感兴趣信息的多少。即小特征根往往代表了噪声,但实际上,向小一点的特征根方向投影也有可能包括我们感兴趣的数据; (2)特征向量的方向是互相正交(orthogonal)的,这种正交性使得PCA容易受到Outlier的影响,例如在【1】中提到的例子(3)难于解释结果。例如在建立线性回归模型(Linear Regression Model)分析因变量(response)和第一个主成份的关系时,我们得到的回归系数(Coefficiency)不是某一个自变量(covariate)的贡献,而是对所有自变量的某个线性组合(Linear Combination)的贡献。

在Kernel PCA分析之中,我们同样需要这些假设,但不同的地方是我们认为原有数据有更高的维数,我们可以在更高维的空间(Hilbert Space)中做PCA分析(即在更高维空间里,把原始数据向不同的方向投影)。这样做的优点有:对于在通常线性空间难于线性分类的数据点,我们有可能再更高维度上找到合适的高维线性分类平面。我们第二部分的例子就说明了这一点。

本文写作的动机是因为作者没有找到一篇好的文章(看了wikipedia和若干google结果后)深层次介绍PCA和Kernel PCA之间的联系,以及如何以公式形式来解释如何利用Kernel PCA来做投影,特别有些图片的例子只是展示了结果和一些公式,这里面具体的过程并没有涉及。希望这篇文章能做出较好的解答。

1. Kernel Principal Component Analysis 的矩阵基础

我们从解决这几个问题入手:传统的PCA如何做?在高维空间里的PCA应该如何做?如何用Kernel Trick在高维空间做PCA?如何在主成分方向上投影?如何Centering 高维空间的数据?

1.1 传统的PCA如何做?

让我先定义如下变量: \( X= [x_1, x_2, \ldots, x_N] \) 是一个\( d \times N \)矩阵,代表输入的数据有\( N\) 个,每个sample的维数是\( d \)。我们做降维,就是想用\( k \)维的数据来表示原始的\(d\)维数据(\( k \le d \))。
当我们使用centered的数据(即\(\sum_i x_i = 0\))时,可定义协方差矩阵\(C\)为:

$$C=\frac{1}{N} x_i x_i^T = \frac{1}{N} X X^T$$
做特征值分解,我们可以得到:
$$CU = U \Lambda \Rightarrow C = U \Lambda U^T = \sum_a \lambda_a u_a u_a^T$$
注意这里的\(C, U , \Lambda\)的维数都是\(d \times d\), 且\( U=[u_1, u_2, \ldots, u_d] \), \(\Lambda = diag(\lambda_1, \lambda_2, \ldots, \lambda_d) \)。
当我们做降维时,可以利用前\(k\)个特征向量\(U_k = [u_1, u_2, \ldots, u_k] \)。则将一个\(d\)维的\(x_i\)向\(k\)维的主成分的方向投影后的\(y_i = U_k^T x_i\) (这里的每一个\(u_i\)都是\(d\)维的,代表是一个投影方向,且\(u_i^T u_i = 1\),表示这是一个旋转变量)

1.2 在高维空间里的PCA应该如何做?

高维空间中,我们定义一个映射\(\Phi : X^d \rightarrow \mathcal{F}\),这里\(\mathcal{F}\)表示Hilbert泛函空间。
现在我们的输入数据是\(\Phi(x_i), i = 1, 2, …n\), 他们的维数可以说是无穷维的(泛函空间)。
在这个新的空间中,假设协方差矩阵同样是centered,我们的协方差矩阵为:
$$\bar{C}=\frac{1}{N} \Phi(x_i) \Phi(x_i)^T = \frac{1}{N} \Phi(X) \Phi(X)^T$$
这里有一个陷阱,我跳进去过:
在对Kernel trick一知半解的时候,我们常常从形式上认为\(\bar{C} \)可以用\(K_{i,j} = K(x_i, x_j)\)来代替,
因此对\(K=(K_{ij})\)做特征值分解,然后得到\(K=U \Lambda U^T\),并且对原有数据降维的时候,定义\(Y_i=U_k^T X_i\)。
但这个错误的方法有两个问题:一是我们不知道矩阵\(\bar{C}\)的维数;二是\(U_k^T X_i\)从形式上看不出是从高维空间的\(\Phi(X_i)\)投影,并且当有新的数据时,我们无法从理论上理解\( U_k^T X_{\mathrm{new}} \)是从高维空间的投影。
如果应用这种错误的方法,我们有可能得到看起来差不多正确的结果,但本质上这是错误的。
正确的方法是通过Kernel trick将PCA投影的过程通过内积的形式表达出来,详细见1.3

1.3 如何用Kernel Trick在高维空间做PCA?

在1.1节中,通过PCA,我们得到了\(U\)矩阵。这里将介绍如何仅利用内积的概念来计算传统的PCA。
首先我们证明\(U\)可以由\(x_1, x_2, \ldots, x_N\)展开(span):
$$ C u_a = \lambda_a u_a $$
$$ \begin{align}
u_a &= \frac{1}{\lambda_a} C u \\
&= \frac{1}{\lambda_a} (\sum_i x_i x_i^T )u \\
&= \frac{1}{\lambda_a} \sum_i x_i (x_i^T u) \\
&= \frac{1}{\lambda_a} \sum_i (x_i^T u) x_i \\
&= \sum_i \frac{x_i^T u}{\lambda_a} x_i \\
&= \sum_i \alpha_i^a x_i
\end{align}$$
这里定义\(\alpha_i^a=\frac{x_i^T u}{\lambda_a} \)。
因为\(x_i^T u\) 是一个标量(scala),所以\(\alpha_i^a\)也是一个标量,因此\(u_i\) 是可以由\(x_i\)张成。

进而我们显示PCA投影可以用内积运算表示,例如我们把\(x_i\)向任意一个主成分分量\(u_a\)进行投影,得到的是\(u_a^T x_i\),也就是\(x_i^T u_a\) 。作者猜测写成这种形式是为了能抽出\(x_i^T x_j = \mathrm{<} x_i, x_j\mathrm{>} \)的内积形式。

$$\begin{align}
x_i^T C u_a &= \lambda_a x_i^T u_a \\
x_i^T \frac{1}{N} \sum_j x_j x_j^T \sum_k \alpha_k^a x_k &= \lambda_a x_i^T \sum_k \alpha_k^a x_k \\
\sum_j \alpha_k^a \sum_k (x_i^T x_j) (x_j^T x_k) &= N \lambda_a \sum_k \alpha_k^a (x_i^T x_k) \\
\end{align}$$
当我们定义\( K_{ij} = x_i^T x_j \)时,上式可以写为\( K^2 \alpha = N \lambda_a K \alpha^a\)
(这里\(\alpha^a\)定义为\([\alpha_1^a, \alpha_2^a, \ldots, \alpha_N^a]^T\).)
进一步,我们得到解为:
$$K \alpha = \tilde{\lambda}_a \alpha \quad \mathrm{with} \quad \tilde{\lambda}_a = N \lambda_a$$
\(K\)矩阵包含特征值\(\tilde{\lambda}\)和\(\alpha^a\),我们可以通过\(\alpha\)可以计算得到\(u_a\),
注意特征值分解时Eigendecomposition,\(\alpha^a\)只代表一个方向,它的长度一般为1,但在此处不为1。
这里计算出\(\alpha_a\)的长度(下面将要用到):
因为\(u_a\)的长度是1,我们有:
$$\begin{align}
1 &= u_a^T u_a \\
&= ( \sum_i \alpha_i^a x_i) ^T (\sum_j \alpha_j^a x_j ) \\
&= \sum_i \sum_j \alpha_i^a \alpha_j^a x_i^T x_j^T \\
&=(\alpha^a)^T K \alpha_a \\
&=(\alpha^a)^T ( N \lambda_a \alpha_a) \\
&=N \lambda_a ({\alpha^a}^T \alpha_a )\\
&\Rightarrow \quad \lVert \alpha^a \rVert = 1/\sqrt{N \lambda_a} = 1/\sqrt{\tilde{\lambda}_a}
\end{align}$$

在上面的分析过程中,我们只使用了内积。因此当我们把\(K_{ij} = x_i^T x_j\)推广为\(K_{ij} = <\Phi(x_i), \Phi(x_j> = \Phi(x_i)^T \Phi(x_j)\)时,上面的分析结果并不会改变。

1.4 如何在主成分方向上投影?

投影时,只需要使用\(U\)矩阵,假设我们得到的新数据为\(t\),那么\(t\)在\(u_a\)方向的投影是:
$$u_a^T t = \sum_i \alpha_i^a x_i^T t = \sum_i \alpha_i^a ( x_i^T t)$$
对于高维空间的数据\(\Phi(x_i),\Phi(t)\),我们可以用Kernel trick,用\(K(x_i, t)\)来带入上式:
$$u_a^T t = \sum_i \alpha_i^a K(x_i, t)$$

1.5 如何Centering 高维空间的数据?

在我们的分析中,协方差矩阵的定义需要centered data。在高维空间中,显式的将\(\Phi(x_i)\)居中并不简单,
因为我们并不知道\(\Phi\)的显示表达。但从上面两节可以看出,所有的计算只和\(K\)矩阵有关。具体计算如下:
令\(\Phi_i = \Phi(x_i)\),居中\(\Phi_i^C = \Phi_i – \frac{1}{N}\sum_k \Phi_k\)
$$\begin{align}
K_{ij}^C
&= <\Phi_i^C \Phi_j^C> \\
&= (\Phi_i – \frac{1}{N}\sum_k \Phi_k)^T (\Phi_j – \frac{1}{N}\sum_l \Phi_l ) \\
&=\Phi_i^T\Phi_j – \frac{1}{N}\sum_l \Phi_i^T \Phi_l – \frac{1}{N}\sum_k \Phi_k^T \Phi_j + \frac{1}{N^2}\sum_k \sum_l \Phi_k^T \Phi_l \\
&=K_{ij} – \frac{1}{N}\sum_l K_{il} – \frac{1}{N}\sum_k K_{kj} + \frac{1}{N^2}\sum_k \sum_l K_{kl}
\end{align}$$
不难看出,
$$K^C = K – 1_N K – K 1_N + 1_N K 1_N$$
其中\(1_N\) 为\(N \times N \)的矩阵,其中每一个元素都是\(1/N\)
对于新的数据,我们同样可以
$$\begin{align}
K(x_i, t)^C
&= <\Phi_i^C \Phi_t^C> \\
&= (\Phi_i – \frac{1}{N}\sum_k \Phi_k)^T (\Phi_t – \frac{1}{N}\sum_l \Phi_l ) \\
&=\Phi_i^T\Phi_t – \frac{1}{N}\sum_l \Phi_i^T \Phi_l – \frac{1}{N}\sum_k \Phi_k^T \Phi_t + \frac{1}{N^2}\sum_k \sum_l \Phi_k^T \Phi_l \\
&=K(x_i,t) – \frac{1}{N}\sum_l K_{il} – \frac{1}{N}\sum_k K(x_k,t) + \frac{1}{N^2}\sum_k \sum_l K_{kl}
\end{align}$$

2. 演示 (R code)


首先我们应该注意输入数据的格式,一般在统计中,我们要求\(X\)矩阵是\(N \times d\)的,但在我们的推导中,\(X\)矩阵是\(d \times N\)。
这与统计上的概念并不矛盾:在前面的定义下协方差矩阵为\(X^T X\),而在后面的定义中是\(X X^T\)。另外这里的协方差矩阵是样本(Sample)的协方差矩阵,我们的认为大写的X代表矩阵,而不是代表一个随机变量。
另外,在下面的结果中,Gaussian 核函数(kernel function)的标准差(sd)为2。在其他取值条件下,所得到的图像是不同的。

KPCA图片:

R 源代码(Source Code):链接到完整的代码 KernelPCA

Kernel PCA部分代码:

# Kernel PCA
# Polynomial Kernel
# k(x,y) = t(x) %*% y + 1
k1 = function (x,y) { (x[1] * y[1] + x[2] * y[2] + 1)^2 }
K = matrix(0, ncol = N_total, nrow = N_total)
for (i in 1:N_total) {
  for (j in 1:N_total) {
    K[i,j] = k1(X[i,], X[j,])
}}
ones = 1/N_total* matrix(1, N_total, N_total)
K_norm = K - ones %*% K - K %*% ones + ones %*% K %*% ones
res = eigen(K_norm)

V = res$vectors
D = diag(res$values)

rank = 0
for (i in 1:N_total) {
	if (D[i,i] < 1e-6) { break }
      V[,i] = V[,i] / sqrt (D[i,i])
	rank = rank + 1
}
Y = K_norm %*%  V[,1:rank]
plot(Y[,1], Y[,2], col = rainbow(3)[label], main = "Kernel PCA (Poly)"
, xlab="First component", ylab="Second component")

3. 主要参考资料


【1】A Tutorial on Principal Component Analysis ,Jonathon Shlens, Shlens03

【2】Wikipedia: http://en.wikipedia.org/wiki/Kernel_principal_component_analysis

【3】 Original KPCA Paper:Kernel principal component analysis,Bernhard Schölkopf, Alexander Smola and Klaus-Robert Müller http://www.springerlink.com/content/w0t1756772h41872/fulltext.pdf

【4】Max Wellings’s classes notes for machine learning Kernel Principal Component Analaysis http://www.ics.uci.edu/~welling/classnotes/papers_class/Kernel-PCA.pdf

ubuntu 中VPN 的使用

今天在ubuntu 10.10 Linux环境中顺利使用pptpd 架设的VPN服务器。

这里把必要的步骤记录一下:

1. 建立profile

用pptpsetup命令:
sudo pptpsetup –create <TUNNEL> –server <SERVER> –username <USERNAME> [–password <PASSWORD>]
TUNNEL是自己起的名字,SERVER填入VPN 服务器地址,username和password按照VPN服务器设置来做。

2. 连接VPN
sudo pon <TUNNEL>
这样就可以连接到VPN服务器。
可以用ifconfig命令检查是否VPN成功架设了,成功的话会出现一个ppp0的interface。
也可以用plog命令检查VPN连接的过程是否顺利。

3.更改route table
sudo route add default dev ppp0

4. 更改DNS服务器
sudo vi /etc/resolv.conf
添上OpenDNS的DNS服务器地址:
nameserver 208.67.222.222
nameserver 208.67.220.220

5. 检查
可以访问http://www.whatismyip.com/ 看看自己的ip是不是已经变为VPN服务器的地址了。